Sunday, July 17, 2011

DIY Peacock Wedding Projects-Part II

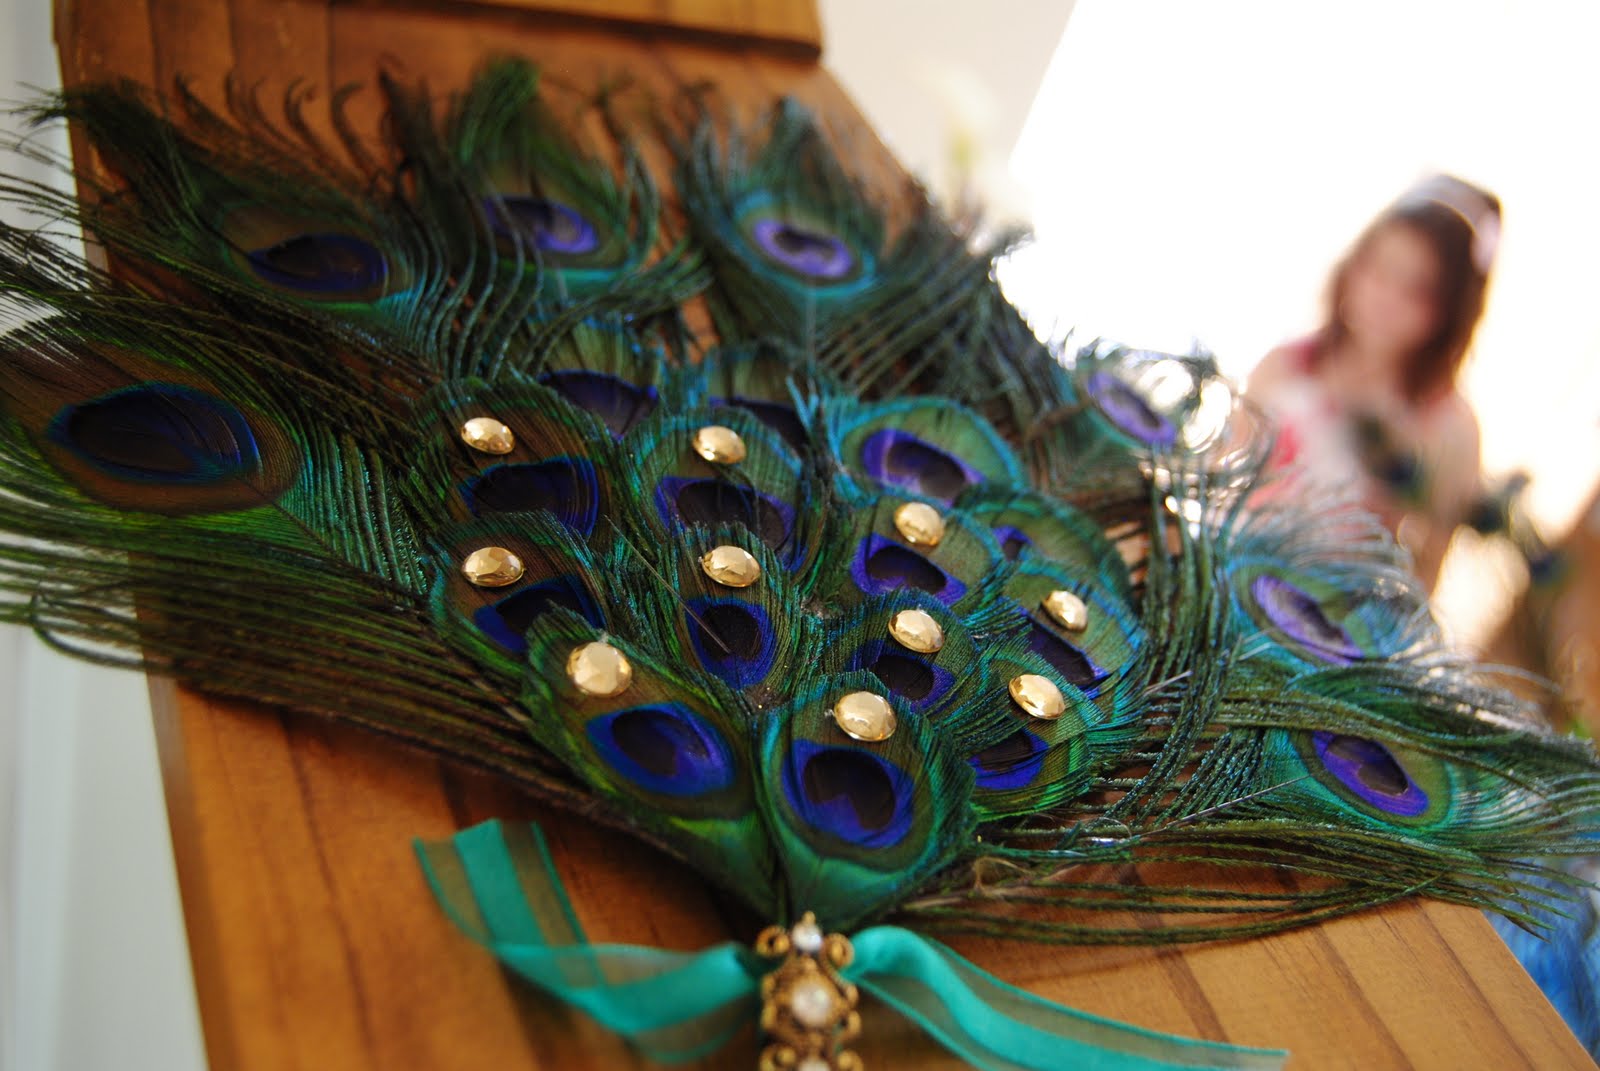
I've loved peacock feathers for a couple of years now but I have to admit that part of the reason I chose to include them in my wedding was because I knew they would be a great place to save money.  By using feathers in lieu of flowers we were able to cut out a substantial amount of money.  I used peacock feathers to make my bridesmaid bouquets and my groom's and groomsmen's boutonnieres.  To make the bouquets I started with a peacock feather pad purchased from Hobby Lobby for about $2.50 each.  Then I hot glued longer feathers to the back of the pad.  I then hot glued the feather topper to a wooden pencil I had wrapped in brown satin ribbon.  I glued a few amber colored rhinestones onto the feathers in the center of the bouquet and tied the base with an aqua ribbon and hot glued an antique-looking gold charm (purchased from JoAnn's).  The bouquets cost less than $10 each!
For the boutonnieres I took single peacock feathers ($1.49 for a 2 pack at Hobby Lobby) and wrapped them with the same brown satin ribbon I used on the bouquets.  They were super easy to make and cost less than $2.00 each.


 In another attempt to save money, I made the pew bows.  Hobby Lobby has some amazing brown lace ribbon that is about 5 or 6 inches wide.  I used this as the base of my bows.  Then I used some sparkly green tulle (also from Hobby Lobby) for the middle bow and made a little bow for the center out of turquoise ribbon that I bought after Christmas at Wal-Mart for $.70 a roll.  I slid a peacock feather into the center of the bow and voila.  A good girlfriend of mine came over and helped me make them one Sunday afternoon and we had a lot of fun making them (although we were covered in glitter from the sparkly tulle by the end of the day)! 

 To decorate the outside of the church I made some tissue paper poms in different shades of blues and greens.  I used the tutorial from Mather Stewart.  They were a breeze to make and cost only a few dollars a piece.  I loved they way they added a little color to the front of the church.


 I did use some fresh flowers to decorate for the wedding.  I absolutely adore blue/green hydrangeas.  A friend of my aunt had a bush that she allowed us to take some blooms from (for free!) so I was able to have several vases in the windows of the church.  They made me so happy!

 I also bought two dozen white roses and a couple of large white hydrangeas (which I separated the blooms on) to use in small bud vases in the windows.  The vases were all ones that I already owned or borrowed from my parents with the exception of the aqua vase, which I bought from Hobby Lobby for $1.99.


 I also used fresh flowers in my bouquet.  I love flowers so much and since I couldn't afford to have an abundance of them in the wedding it was very important to me to have a bouquet with flowers that I loved.  My aunt and I went to Tipton Hurst the day before the wedding and found white snap dragons, blue hydrangeas, and some tinted blue Queen Anne's Lace.  I also included a few of the white roses that I had purchased from Kroger.  We spent a total of $35 on the flowers.  My aunt arranged the flowers for my bouquet and I think she did such an amazing job on it!

 The last DIY project I'm going to share in this post is the bird cage I used on the Guest Book Table for guests to put cards in.  I had seen a few weddings where they did something similar and I thought it was such a great idea.  I found the perfect bird cage at Hobby Lobby with slots large enough for any card to fit through.  I used some amazing green ribbon I had found on clearance after Christmas and tied it around the top of the cage.  I printed a sign that read "Cards" on my scrapbook paper that I had in my stash of pretty paper that I've bought and had no use for.  Finally, I topped the cage with a peacock that my aunt had gotten me.  It turned out exactly how I had envisioned and I was so proud of it! 


Linking to:

Mod Vintage Life

Tuesday, July 12, 2011

Peacock Wedding Shoes on a Budget

As I was looking for inspiration for our vintage/peacock themed wedding I came across these shoes that I HAD to have:
They were the embodiment of everything I wanted our wedding to be.  I was already using lots of vintage brooches, the color was the perfect shade of teal that I can't get enough of, and the feather was the perfect touch of peacock without going to far.  But at $142 they were way over my budget.  As I was shopping for wedding dresses at David's Bridal I came across these very similar shoes:

They were only $59 and the bridal consultant said they could be dyed any color for $5.  So I had them dyed "Oasis" and added my own feathers and for $64 I had a very similar pair of shoes for my wedding day that got LOTS of compliments!
Linking to:


The DIY Show Off


Sunday, July 10, 2011

Wedding DIY Projects-Part 1

We had a very limited budget for our wedding so I had several DIY projects.  I had found a burlap Just Married sign on Etsy that I thought would look perfect hanging on the front of the church after the ceremony.  But at $48 it was a little more of a splurge than I could afford so I decided to try to make one myself.  I bought 2 yards of burlap from Hobby Lobby.  I wasn't sure exactly how much I would need and I wanted to make sure I had plenty in case it took a couple of tries to get the banner right.  I decided what size I wanted each pennant and cut out a template from some cardboard I had lying around.  Then I traced the cardboard template on the burlap and cut out the pennants.  I used a stencil and acrylic paint (also from Hobby Lobby) and painted the letters onto the burlap pieces.  I cut out two extra pieces and hot glued white flowers onto them.  Then I glued the pennants onto a satin ribbon. 


Linking to:

The Girl CreativeJoin  us Saturdays at tatertotsandjello.com for the weekend wrap 
 up           party!


Mod Vintage Life


The DIY Show Off


Wedding Decor Turned Home Decor

It was really important to me that there were a few pieces from our wedding that we were able to use in our house so we would always have reminders of our wedding day close by.  I've finally found a home for a few of my favorite things from the wedding so I thought I'd share.


My husband carved me this wooden "E" that we hung on the door of the church and I painted it.  Some of my favorite pictures from our wedding are the ones of this "E" and we got lots of compliments on it.  After deciding that I didn't like it hanging on the front door of our house I decided to hang it in the entry way of our house.

 I ordered this gorgeous sign on Etsy with our last name and wedding date to display on the Guest Book Table.  I am so happy with how it turned out!  The seller (defineyourspacevinyl) was so easy to work with and made the sign exactly how I wanted it.
The sign (as well as the bird cage I used in place of a card box) is now at home on top of our entertainment center. 


Linking to: